Hand and Finger Positions for Violin
Video 1: Hand and finger positions on a fiddle.
One of the keys to playing the fiddle is knowing where to put your fingers. At BGD, I provide both notation and tablature (a numbering system) so that all players will know what note to play and which finger to use.
Before we begin, I would like to distinguish between finger positions and hand positions. In fiddle tablature, the fingers are numbered 1 through 4, with the index finger being finger number 1 and the pinky being finger number 4. Let’s focus on the G string. If you start near the nut and slide your finger toward the bridge, you will eventually get to another G note, exactly one “octave” higher than the open G. Fiddle music uses a chromatic scale, which divides this octave into 12 even-tempered intervals called half-steps. A half-step is commonly known as the distance from a natural to a sharp. From the open G to the octave G are 12 half-steps, and so there are 12 possible finger positions. Fiddle tablature actually goes one half-step higher, to the note above the octave position. Since there are four strings (G, D, A, and E), and 13 finger positions, there are a total of 52 possible finger positions (56 counting the open notes). Since you must move your hand in order to play all those finger positions, we will also define a total of six different hand positions.
One might think that the finger positions would be numbered simply one through thirteen. However, this is not the case. The finger positions are actually based on the natural rest position of the hand in the 1st, 3rd, and 5th hand positions. I know this seems confusing, but hopefully I will explain it well below. I will go over those hand positions first.
The 1st hand position
The first seven finger positions are based on the natural rest position of the hand in the 1st hand position. Do this exercise: Curl your fingers at the knuckle and then turn your hand toward you as if you are examining your nails. Now try to spread your knuckles apart. You probably find that you can easily make a gap between your 1st and 2nd knuckles, and your 3rd and 4th knuckles, but not between your 2nd and 3rd knuckles. Now imagine that your fingers are curled around the neck of a violin, with your first finger exactly two half-steps up from nut. This is actually the “default” location for placing your fingers on the violin. There are two half-steps from the 1st finger to the 2nd finger, one half-step from the 2nd finger to the 3rd finger, and two half-steps from the 3rd finger to the 4th finger.
These finger positions are numbered 1, 2, 3, and 4. The half-step between the 1st and 2nd fingers is called 2L, meaning “2 lower.” The half-step between the 3rd and 4th fingers is called 3H, meaning “3 higher.” If it is played with the 4th finger, it is commonly called 4L meaning “4 lower.” Therefore, 3H and 4L are the same note, but played with a different finger. The half-step between the 1st finger and the nut is called 1L. The nut position is called “0,” meaning “open.” These finger positions define the first hand position.
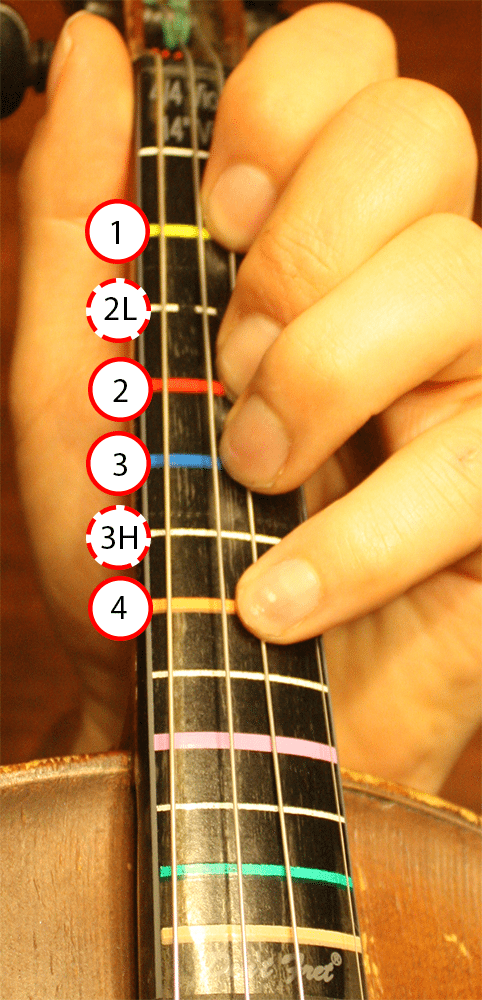
Figure 1. The fingers in the first hand position, over a “Don’t Fret” sticker. The first hand finger positions are at 1, 2, 3, and 4.
Below is a line of sheet music that includes both notation and tablature. The tablature is below the notation. Notice how the tablature staff has only four lines, labeled G, D, A, and E. These four lines correspond to the four strings of the fiddle. Therefore, when you see an ‘0’ on the G line, that means to play the G string open. Although this seems redundant, there are many times when it is desirable to use the 4th finger (for example, fast songs where it takes less time to play the 4th finger than change to another string for the open note). The two measures below include the “natural position” notes (no “L” or “H” notes) on the G and D strings in the first hand position. That is how you can remember the correct finger positions for the 1st hand position. Notice that the 4th finger on the G string should be played in unison with the open D string. If these make the same note, you will know that your pinky is in the correct location.
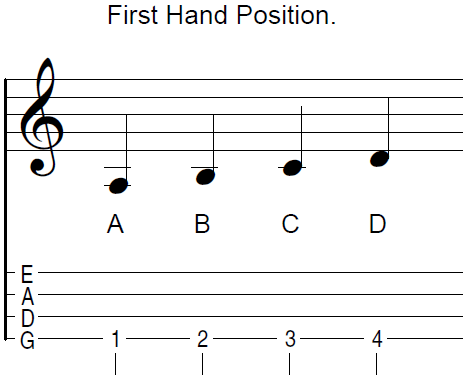
Figure 2: “Natural position” notes in the first hand position.
For practice playing notes in the various hand positions, please download the sheet music using the link below. First, notation and tablature are given for the “natural position” notes for all four strings. Next, notation and tablature are given for the entire chromatic scale in the 1st hand position. The first hand position is on page 1.
Sheet music for practicing six different hand positions (download PDF, 2 pages)
Video 2: Play-along video for practicing six different hand positions with a metronome.
The first hand position is perfect for playing fiddle tunes in G, A, B, C, D, and E, while other keys lend themselves better to other hand positions. Now that you are familiar with the 1st position, let’s take a quick look at the some others.
The images below are quick guides to the first six different hand positions. You may click the image for a larger version. In the left-most image, the chromatic notes for one octave on the G string are on the left side, while the tablature numbers for those same notes are on the right side. I want to start with the three odd-numbered hand positions first, because they work together to define our tablature numbering system. We have already discussed the first seven finger positions which are based on the first hand position. These are colored red. In the center image, you see the 1st, 3rd, and 5th hand positions, colored red, green, and blue respectively. Notice the brackets that indicate the first position. The brackets point to the where the 1st finger and the 4th finger go. The 2nd and 3rd fingers go in the center of the bracket.
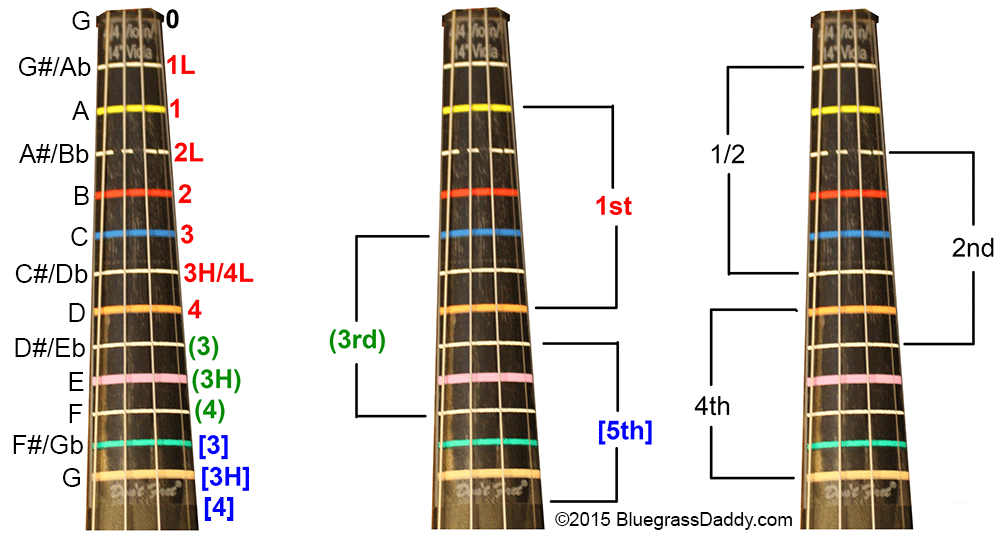
Figure 3: Quick-reference diagram for the first six hand positions. Click for a larger image.

Figure 4: Visual reference: Six different hand positions. Click for a larger version.
The 3rd Hand Position
The 3rd hand position (green) is found by placing your first finger where the 3rd finger would normally go in the 1st hand position. The 2nd finger would therefore go where the 4th finger would normally go in the first hand position. This means that the 2nd finger should be in unison with the adjacent higher string played open. This is how you “locate” the 3rd hand position.
The next three numbered positions in fiddle tablature come from the 3rd position. Using parenthesis, the tablature indicates where the 3rd and 4th fingers go when you are in the 3rd hand position: (3), (3H), and (4). In the image above, these are colored green.
The third hand position is used a lot in bluegrass, particularly in the keys of D and A. Prominent examples include “Katy Hill” and “Sally Goodin.”
Below is notation and tablature for the natural rest position of the hand in the 3rd position, for the G and D strings. Sometimes it is difficult to know remember which finger to use when you are in the a higher position, and so I always include a small circle below the tablature that tells you which finger to use. For all the notes in the 3rd position, please download the tablature linked above.
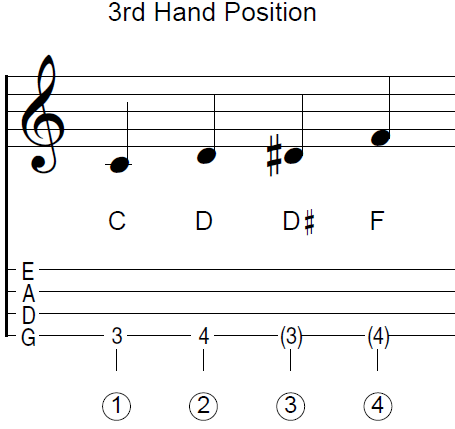
Figure 5: “Natural position” notes in the third hand position.
The 5th Hand Position
The 5th hand position (blue) is found by placing your 1st finger where the 3rd finger would normally go in the 3rd hand position. The 2nd finger would therefore go where the 4th finger would normally go in the 3rd hand position. The final three numbered positions in fiddle tablature come from the 5th position. Using brackets, the tablature indicates where the 3rd and 4th fingers go when you are in the 5th hand position: [3], [3H], and [4]. In the image above, these are colored blue.
The fifth position is rarely used in bluegrass.
Below is notation and tablature for the natural rest position of the hand in the 5th position, for the G and D strings. For all the notes in the 3rd position, please download the tablature linked above.
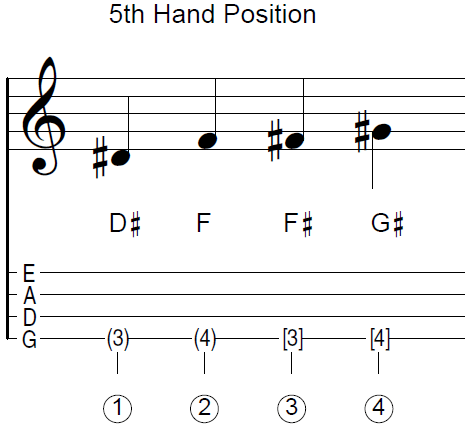
Figure 6: “Natural position” notes in the fifth hand position.
Now that you know where the number in the tablature come from, let’s go back and look at the other three hand position. The brackets for these positions are shown in the right-hand image of Figure 3 above.
The 1/2 Hand Position
The 1/2 hand position is located by putting your hand in the 1st hand position, then moving your entire hand one half-step toward the nut so that the 1st finger is in the 1L position.
The 1/2 hand position is common in bluegrass, and will be used when learning tunes in F and Bb. Prominent examples include “Beaumont Rag” and “Daly’s Reel.”
Below is notation and tablature for the natural rest position of the hand in the 1/2 position, for the G and D strings. Notice that the 3H had been replaced with a 4L. For all the notes in the 1/2 position, please download the tablature linked above.
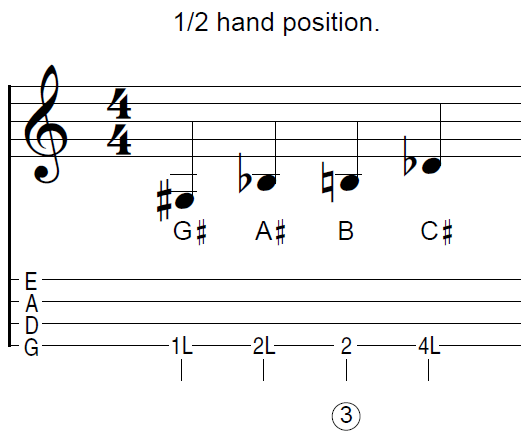
Figure 7: “Natural position” notes in the 1/2 hand position.
The 2nd Hand Position
The 2nd hand position is located by putting your hand in the 1st hand position, then moving your entire hand one half-step toward the bridge so that the 1st finger is in the 2L position. The 2nd finger would therefore go where the 3rd finger would normally go in the first hand position. This means that the 2nd finger should be one octave higher than the adjacent lower string played open. This is how you “locate” the 3rd hand position.
The 2nd hand position is common in bluegrass. It is used a lot when higher notes are needed in the keys of F, C, and G. One prominent example is the C part of “Jerusalem’s Ridge.”
Below is notation and tablature for the natural rest position of the hand in the 2nd position, for the G and D strings. For all the notes in the 2nd position, please download the tablature linked above.
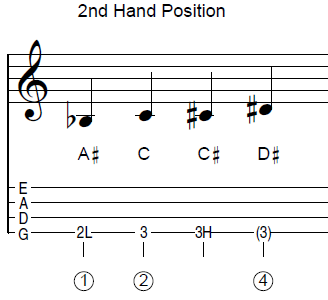
Figure 8: “Natural position” notes in the second hand position.
The 4th Hand Position
The 4th hand position is found by placing your first finger where the 4th finger would normally go in the 1st hand position. This means that the 1st finger should be in unison with the adjacent higher string played open. This is how you “locate” the 4th hand position.
The 4th hand position is not common in bluegrass. It is mainly used when the pinky plays an octave higher than the open string. One prominent example is “Lime Rock.”
Below is notation and tablature for the natural rest position of the hand in the 2nd position, for the G and D strings. For all the notes in the 2nd position, please download the tablature linked above.
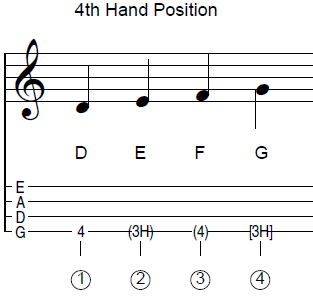
Figure 9: “Natural position” notes in the fourth hand position.
Now you know all of the finger and hand positions used in tablature!